Friday, February 19, 2010

Guardian Griddle Cakes

A few posts ago I wrote about stovetop broiling steaks with the "Guardian Service Griddle Broiler," so this time we'll put its "griddle" function to task with pancakes. As Betty Gay waxes nostalgically in the Tested Recipes cookbook, "hot cakes or 'flapjacks,' as we called 'em back on the farm, with plenty of butter and maple syrup will make you feel that this old world's not so bad after all."
I had two distinctly different grandmothers. My father's mother Pauline, who lived "back on the farm" in North Dakota and cooked three large meals for the family and farmhands every day, had a more practical approach to cooking. My maternal grandmother, Muriel, was a professional musician and an excellent cook with a few "signature dishes"—and blueberry pancakes was one of them.
Muriel and Grandpa Ken rented a summer cottage in Rhode Island each year and when blueberries were at the peak of season she'd whip up memorable batches of those pancakes: light and fluffy but crisp and riddled with fresh berries running with juice that stained the cakes purple. Of course, she fried them stovetop in a quarter inch of oil in a cookie sheet... but as a once or twice in late summer treat, they were magical.
Andrew and I do our best to buy locally, seasonally and organically grown foods (or whichever of the combination we can find or afford) and while it's far from blueberry season, I have to admit a moment of weakness recently when Chilean blueberries showed up at our local grocer. A few days of unseasonably hot weather this week made it feel like summer and seeing those berries on sale made me long for Muriel's pancakes and ... I snapped. Fretting about the carbon footprint of this "inexpensive" pint of blueberries, I bought them anyway. In retrospect: I'd have been better off with a handful of chopped apple... fruit that's been shipped or stored or ripened out of season is always a disappointment and never ends up being "worth it." But sometimes these lessons have to be relearned...

SLAPPING THE CAKES
There's nothing unique about the GS pancake recipe (just make sure the baking powder is still active; test by pouring some hot tap water over a half teaspoon of baking powder—if it bubbles, it's still fresh enough; if not, the pancakes won't rise). What's crucial here is technique: the timing and the griddle heat.
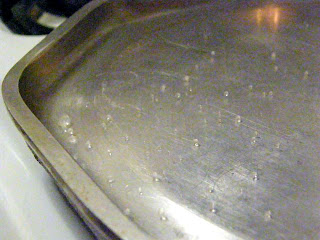
Who needs Teflon? The trick to non–stick cooking on the Guardian Service Griddle is the heat. To prevent pancakes from sticking and burning, first warm the griddle for 5-7 minutes on a medium heat (1/2 flame on a gas stove) then test with a bit of cold water. I wrote about this "water test" in the steaks post, but I've taken a few more pictures to show you another example of the "dashing around like mad" effect mentioned in the cookbook: when the griddle is at optimum heat a bit of cold water poured on the griddle will retain it's shape, like globules of mercury rolling across the surface. If the water spreads out and sizzles, it's not quite hot enough and if it evaporates instantly it's too hot. Just set it off the heat for a few minutes.
"No need to worry about overtaxing the family's digestive system because Guardian hot cakes are baked—not fried in grease," notes Gay in the intro to "Hot Cakes... without grease or smoke." In effect, you are "baking" the pancakes on a greaseless griddle and, as with all GS cookware, the aluminum evenly distributes heat so you can cook 5 or 6 average-sized (not IHOP big-as-your-head sized) flapjacks at a time.

Timing: when bubbles appear on top, break and hold their shape, the under side has browned. Using a spatula, flip and brown other side. Place cakes in a pre-heated GS unit until ready to serve (keep the cover ajar so the steam escapes and they don't get soggy).
GUARDIAN GRIDDLE CAKES
Makes 2 dozen (approx 4" in diameter)
NOTE: If you're not feeding an army, use 1 egg and halve the remaining ingredients for a dozen.

2 cups flour
4 tsp. baking powder
1 tsp. salt
2 Tbsp. sugar
1 egg, beaten
1 1/2 to 1 /3/4 cup milk (according to desired consistency)
2 Tbsp. melted butter
  1. Sift together flour, baking powder, salt and sugar.
  2. Combine beaten egg and milk.
  3. Stir into dry ingredients, adding more milk if thinner cake is desired.
  4. Blend in melted butter. (Optional: fold in 1 cup of chopped fruit (apples, bananas, blueberries in season...)
  5. Preheat griddle over medium heat, test for temperature and bake cakes as directed above.

Friday, February 12, 2010

Sweets for the Sweet: Devil's Food Cake


I say "The devil is in you" and to resist you I try...
- Lorenz Hart, "Lover" (1932)


I'd planned to make a carrot cake as my first adventure in "Top Stove Baking" in the Guardian Service Kettle/Canner... but the approach of Valentine's Day inspired me to bake a Devil's Food Cake for my beloved. For Andrew, if it doesn't contain chocolate it's not truly a dessert...

"Top Stove Baking the Guardian Way Brings a New Fascination to this Art," begins the cakes section in the Guardian Service Tested Recipes cookbook. As I lowered the two-tiered rack of cakes into the Kettle/Canner unit, I was fascinated—baking an entire cake on one burner, in an aluminum canner seems like a hare-brained scheme/mad culinary science project... but the results are moist and tender, with a savings in fuel.

I've posted a quick slideshow of the highlights below the recipe to help walk you through the process.

DEVIL'S FOOD CAKE
for the Guardian Service Kettle/Canner
Baking Time: 30-40 minutes. (Two 9-inch layers)

3/4 cup cocoa
3/4 cup brown sugar
1 1/4 cups milk
1/2 cup butter*
1 tsp salt
1 1/2 tsp vanilla
1 cup granulated sugar
3 eggs
1 tsp baking powder
3/4 tsp baking soda
2 cups sifted cake flour

*The original recipe calls for shortening... to lighten it, I substituted 1/4 butter, 1/4 cup applesauce and three minced prunes.


  1. Assemble all ingredients so everything is handy and at room temperature.
  2. Mix cocoa with brown sugar.
  3. Heat milk in unit over medium heat (a trio pot, or the 1 1/2 or 2 qt dome cooker work well). The recipe says "scald," but it only needs to be warm enough to dissolve the sugar. Add gradually to brown sugar/cocoa mixture. Beat until smooth, cool.
  4. Cream together butter, salt and vanilla. Add granulated sugar gradually, cream until light. Add eggs one at a time, beating after each addition.
  5. Sift baking powder and soda with flour. Add to egg mixture alternately with cooled cocoa mixture, stirring until smooth. Pour into greased layer pans.
  6. Meanwhile, remove rack from unit and preheat—(place covered unit over high heat for 15 mins). Bake on medium heat 20 mins or until batter is firm, then shift positions from bottom to top and visa versa (This maneuver takes a little careful planning: make sure you've got a place to unpack the hot lid, the hot racks and two hot, filled cake pans before you disassemble and pack it up again. You may also want to give the heat a boost for a minute or two to recoup any loss during this transition). Cook until a tooth pick stuck into center of cake comes out dry. (Cake should be slightly shrunk from sides of pan).
  7. Remove from Kettle oven, let stand about 5 min. on a cake rack, then turn out, finish cooling.
  8. When cold, ice as desired. "(Don't become impatient and go ahead of the game," writes GS Director, Betty Gay, "The icing will be come thinnish and the cake soggy—very, very sad for the two of 'em)."
  9. Try icing this cake with Caramel Icing, sprinkle with chopped nuts or coconut. (It's what later came to be known as a "German Chocolate Cake," originally published as "German's Chocolate Cake" in a local Dallas, TX newspaper in 1957. I frosted with the Caramel Icing, sprinkled pecans between the layers and finished the fondant with a mixture of more pecans, shredded coconut, grated chocolate, cocoa and spices (nutmeg, mace, clove, cinnammon, cardamom, white pepper, ground sea salt).
CARAMEL ICING
1 cup brown sugar
1/4 tsp salt
1/3 cup canned milk or cream*
3 tbsp butter
1 tsp vanilla
Confectioner's sugar
optional: 1 cup chopped nuts or shredded coconut or chocolate, etc.
  1. Combine brown sugar, salt and cream in unit. Bring to the boiling point and leave on medium flame, about 5 min., or until slightly thickened.
  2. Remove from unit, add butter and vanilla, cool slightly. Add sifted confectioner's sugar to give spreading consistency (about 1 cup). Beat until smooth.
  3. Spread between layers and on top and sides of cake. Cover with cocoanut, if desired.
NOTE: Don't worry if icing becomes too thick, beat in cream or milk to give spreading consistency. *I used half-and-half, then brought it back up after cooling with a little more... plus some brandy...

Tuesday, February 9, 2010

Tuna Noodle Casserole... with integrity

Is any meal more comforting than a Tuna Noodle Casserole?

Though casserole recipes date back hundreds of years (made of anything from chicken or turkey to lobster or sweetmeats) the Tuna Casserole as we now know it didn't become an American staple until after the commercial canning of tuna in 1903 and a corporate promotional effort to encourage homemakers to use it as a protein alternative.

During the Great Depression, casseroles became increasingly popular as a means to extend the flavor of meat or fish to feed a whole family and Campbell Soup actively promoted their Cream of Mushroom Soup as an economical alternative to homemade sauces. From the 1930s through the 1950s, with the introduction of glass and lighter-weight metal cookware such Pyrex and Guardian Service, casseroles became quicker and easier to make and by the 70s, the rise of processed food led to the ubiquitous "Can-Can" Casserole (a can of tuna, a can of condensed mushroom or cheddar soup, a can of French's fried onions), robbing the dish of some of its wholesome elegance and sophistication.

A survey of casserole recipes from the 1940s forward reveals an increasing reliance on processed ingredients (what Michael Pollan refers to as "Dump-and-Stir" recipes). Obviously the first recipe using a can of Campbell's Cream of Mushroom soup was published by the company itself: in "Easy Ways to Good Meals: 99 Delicious Dishes Made With Campbell's Soups," 1941, we're advised, 
"Learn how to use Campbell's Soups in your casserole dishes. Discover what zestful flavor they give--what quick and easy substitutes for cream sauce some of them are--the precious minutes they save you in preparation--they make meals so attractive!"
In the 1946 edition of the stalwart "Joy of Cooking," even Irma Rombauer underscores the meal's convenience ("an excellent emergency dish") and uses a 16 oz can of mushroom soup. But of two Betty Crocker cookbooks I referenced, (the "Picture Cook Book," first edition, 1950 and "So You're Serving A Crowd," 1952), both include a white sauce rather a can of soup (although General Foods had more interest in selling flour and cereals than pre-packaged soups... and the second recipe is topped with Wheaties).

By 1965, the classic "Can-Can" Casserole had fully evolved into a warmed-over mess of pre-packaged foods. The Betty Crocker "Dinner in a Dish" calls for cans of not only soup, onions and tuna but canned macaroni and cheese too. Factories made that meal months ago—you're just warming it up.

While the Guardian Service Tested Recipes Cookbook doesn't include a recipe for Tuna Noodle Casserole, it has an easy Escalloped Salmon recipe which I've taken as a guide, employing whole ingredients and topped with fried leeks. Less sodium, less fat, fewer preservatives and more flavor, nutrition and, yes, integrity... and only one can—tuna—please.

TUNA NOODLE CASSEROLE
for the Guardian Service Casserole/Tureen

8 oz egg noodles, cooked and drained
2 tbsp butter, plus some to dot the crust
8 oz Crimini mushrooms, quartered
2 tbsp dry sherry
1 shallot, minced
2 celery stalks, diced
2 tbsp flour
1 cup milk
2 tbsp sour cream
1 tsp dried dill
1 tsp grated nutmeg
1 12 oz can albacore tuna in water
salt and pepper to taste
8 oz fresh or frozen sweet peas
1/2 cup bread, cracker or potato chip crumbs
1/4 cup grated Parmesan and/or cheddar cheese
1 leek, sliced into rings, fried in bacon fat and/or olive oil


In Guardian Service Cookware, prepare noodles in just enough water to cover.
  1. Cook Egg Noodles in the Tureen unit: Place noodles in Tureen, add pinch of salt and cover with boiling water. Cover and let steam for 8-10 minutes (they should be slightly under cooked so they don't turn to mush when baked in the casserole). Drain noodles in a colander with cold water and set aside.
  2. Prepare the topping: Slice the leek into thin rings and fry in melted bacon fat and or olive oil until brown and crisp. Grate cheeses and crumb bread or crackers and set aside.
  3. In the Casserole dish, melt 1 tbsp butter and sauté mushrooms until they release some of their liquid. Add sherry and simmer another few minutes. Remove mushrooms and set aside. Add remaining tbsp butter to mushroom juices; add the onion and celery and sauté until translucent.
  4. Gradually sprinkle flour over mixture, stirring constantly until it forms a roux and browns. Add milk and sour cream gradually and continue to stir until thickened. Remove from heat and add seasoning. You may wish to mix in the cheeses as well, or save to top the crust.
  5. Drain one 1 large (12 oz) can of tuna fish and flake with a fork. ("Be careful not to mince it as that isn't nearly as good," notes Rombauer). Fold in the egg noodles, peas and fish, ending with some noodles on top.
  6. Cover the top with crumbs, cheese and fried leeks, dot with butter.
  7. Place the tureen inside the casserole and cover. Cook over medium to 2/3 flame for 30 minutes or until heated through.
  8. Optional: Brown the crust using the stove-top browning technique.
A white sauce replaces the "traditional" canned soup.
The Guardian Service Casserole-Tureen bakes casseroles stove-top.
For the true Guardian Service enthusiast: Stove-top browning


Thursday, February 4, 2010

Stove-Top Steaks


The Griddle/Broiler is another "combination" cooker in the Guardian Service line: it handles everything from grilled cheese sandwiches to greaseless pancakes (the subject of an upcoming post) and broils meats, vegetables or fruits efficiently; simple to serve and clean up.
BROILED STEAKS
on the Guardian Service Griddle/Broiler
  1. Brush lean cuts with melted butter, fat or oil (or marinate).
  2. Place Griddle/Broiler over a 2/3 flame and preheat 5 to 7 min. Test for temperature by sprinkling cold water over the surface. "If drops retain shape and dash about like mad, you're ready to start," notes Betty Gay in Guardian Service Tested Recipes; and "dash" they do—like little glass marbles (see below). "If water spreads out, Griddle is not hot enough; if water evaporates immediately, Griddle is too hot—just set off the flame for a while."
  3. Put steaks on Griddle and broil over 1/3 flame (or 2/3 for medium to well done steaks) for about 5-7 minutes, turn and brown on other side.

NOTE: "Surplus fats drain into the groove around the edge so that foods are broiled instead of fried in grease and juices and flavors remain in meats rather than evaporating through contact with a direct flame." For added "New Recession" thrift cooking: retain the excess fat as basis for a gravy; and if you're broiling a bone-in steak, save the leftover scraps and bones for stock (pictured below: the 1/2 qt cooker with left over sirloin scraps and vegetable scraps).